

In today’s fast-paced development environments, setting up an efficient Internal Developer Platform (IDP) can significantly streamline your team’s workflows. Backstage.io, an open-source platform created by Spotify, offers a robust solution for building your own customizable IDP.
Executive summary
- In this blog post, we will explain how to configure Backstage.io using GitHub for source management, authorisation, and authentication.
- While Backstage offers an impressive range of plugins through its marketplace, it also introduces certain complexities and maintenance requirements. (This blog does not cover aspects like deploying Backstage to a cloud provider, monitoring it, or upgrading it, but it’s crucial to remember that these tasks will add further layers of complexity.)
- You’ll see that building an IDP is quite a complex process indeed. If you’re up for the task, this blog gives you some advice on how to get there. However, building your own IDP can be very time-consuming and complex, so you might want to consider alternatives such as buying an IDP solution out of the box that is already tailored to your needs.
- Your decision should be informed by your specific needs, company size, and budget. Whether you are considering leveraging open-source solutions, hiring experts, or investing in a turnkey SaaS solution, this blog aims to guide you toward making the best choice for your organization.
Let’s get started.
Backstage.io as an IDP
It defines itself as an Internal Developer Platform (IDP) that enhances developer productivity and standardises the development process. It offers a centralised portal for accessing tools, services, and documentation, reducing mental effort. Key features include a comprehensive service catalogue, template engine, and extensibility via plugins.
Backstage.io’s plugin marketplace offers a variety of extensions that cater to different aspects of the development lifecycle. These include CICD integrations, monitoring and observability, security and compliance, infrastructure management, collaboration tools and documentation.
It improves the developer experience by minimising context switching and enhancing collaboration. As an open-source project, it benefits from community contributions and supports security and compliance. Scalable to support various organisational sizes, Backstage.io empowers developers to deliver high-quality software efficiently and consistently.
Configuration
Requirements
The subsequent steps guide you through a Backstage installation process and its integration with GitHub.
The following dependencies are necessary:
- A GitHub Account and an Organisation (Create account)
- Node.js version 18 or higher (Install NodeJS)
- Yarn CLI (Command Line Interface) (npm install –g yarn
Configuring Backstage service
The Backstage team has developed a command to set up your individual configuration. The command generates a directory containing all the necessary source code to configure and operate Backstage. To initiate the process, open a terminal and execute the following command:

During the execution of the previous command, you will be prompted to provide a name for the instance. I have opted for “my-backstage”.
During the installation process, my `yarn install` command failed. This occurred due to a specific issue: if you encounter a failure with yarn install and you are utilising Python 3.12, an error message may appear indicating `ModuleNotFoundError: No module named ‘distutils’` when attempting to install “gyp”. To resolve this, you need to install the deprecated package globally so that Yarn can access it for installing gyp. This can be addressed by executing the following command:

Once this dependency is resolved, you have two options: either attempt to rectify the current installation or create a new one using the @backstage/create-app command, as described earlier. If you choose to address the current installation, the subsequent commands are necessary:

After the installation, configuring GitHub is the next step. Fortunately, the Backstage team has developed a CLI (Command Line Interface) tool that streamlines this process. In the past, such configuration required manual intervention. However, with this CLI tool, the process is simplified.
This enhancement not only improves the overall experience but also facilitates adoption by making the setup more accessible and user-friendly. As part of this configuration, you will need your GitHub organization name.

Now, a browser will open the GitHub application setup workflow. Initially, it will prompt you to provide an application name. This name must be unique across all accounts.
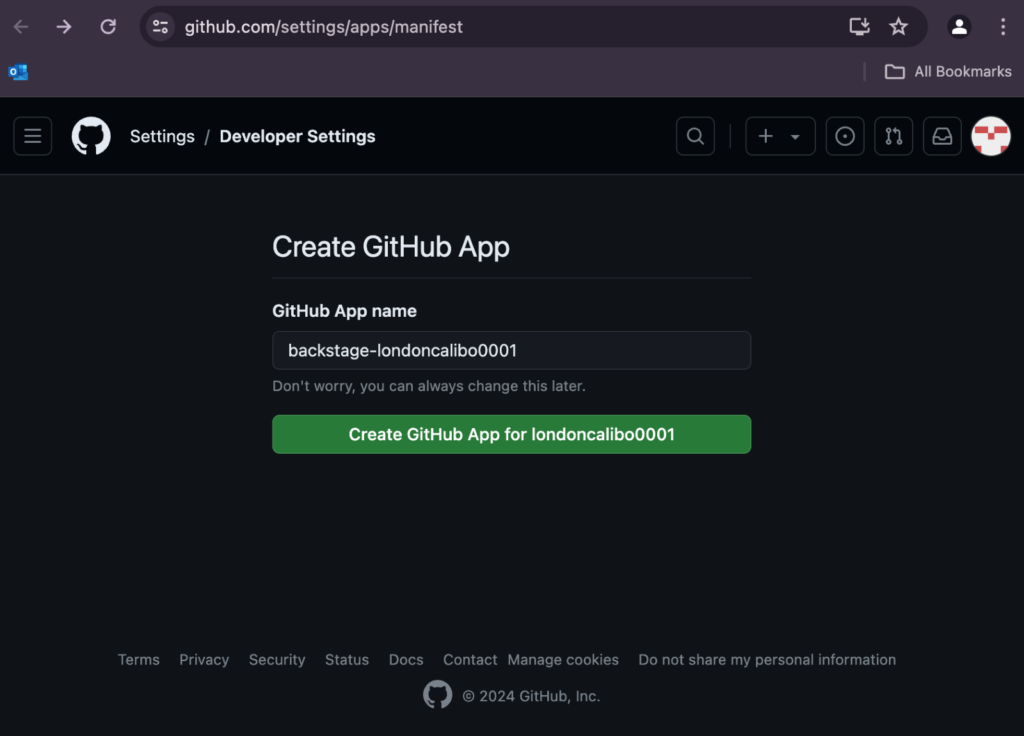
Click on “Create GitHub App for <your organisation name>” and a new screen will appear, prompting you to specify whether you want to grant access to all repositories and the type of access that will be provided.
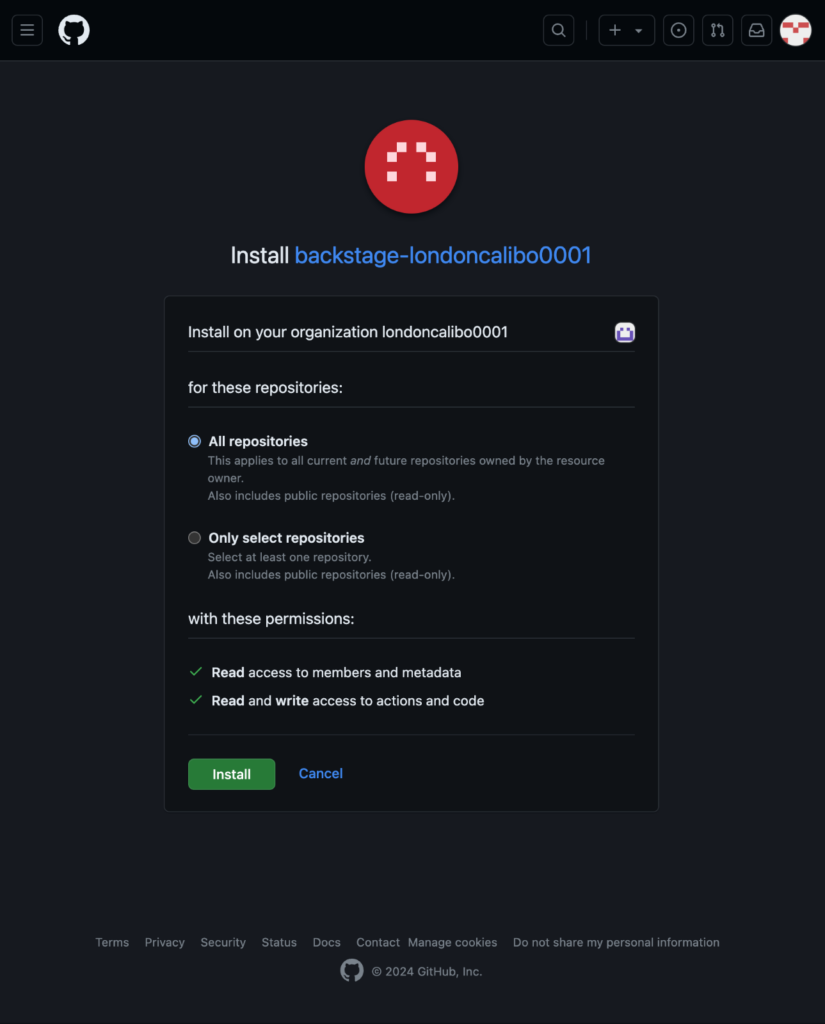
Now, you must grant approval for this GitHub application to access your organisation by clicking on “Install”. Following this step, a new file is generated at the root directory. It is crucial not to commit this file to your repository. Doing so would expose sensitive information, potentially compromising the security of your repository.
Update the `app-config.yml` file, situated at the root directory of your installation (in this case, `my-backstage`). Replace the GitHub integration section with the following lines:

Now, we are ready to start Backstage locally, executing this command:

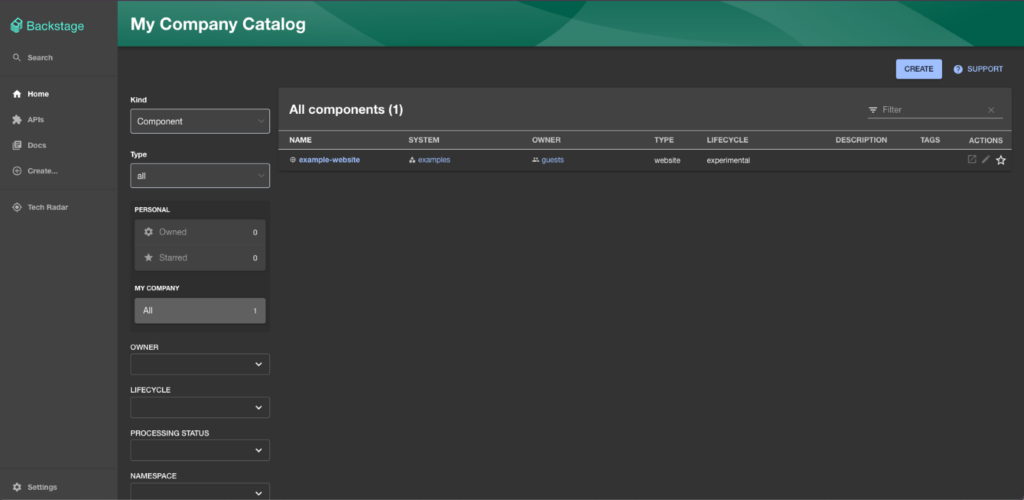
A new browser window will open, displaying the running application as illustrated in the following screenshot.
Now, let us add the GitHub authentication provider, first create an OAuth application going to your user settings and clicking “Register new application”

These are the details to authenticate from your localhost, later when this gets deployed to a production environment these values need to be updated.
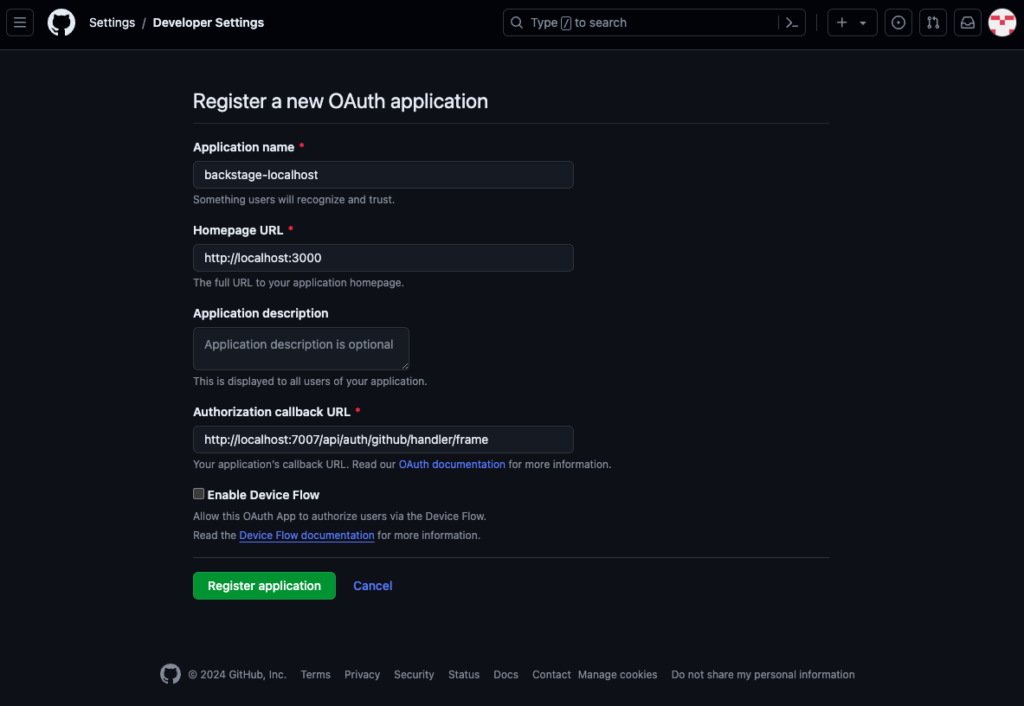
Generate a client secret clicking on the “Generate client secret” button, these two values need to be saved in .env file
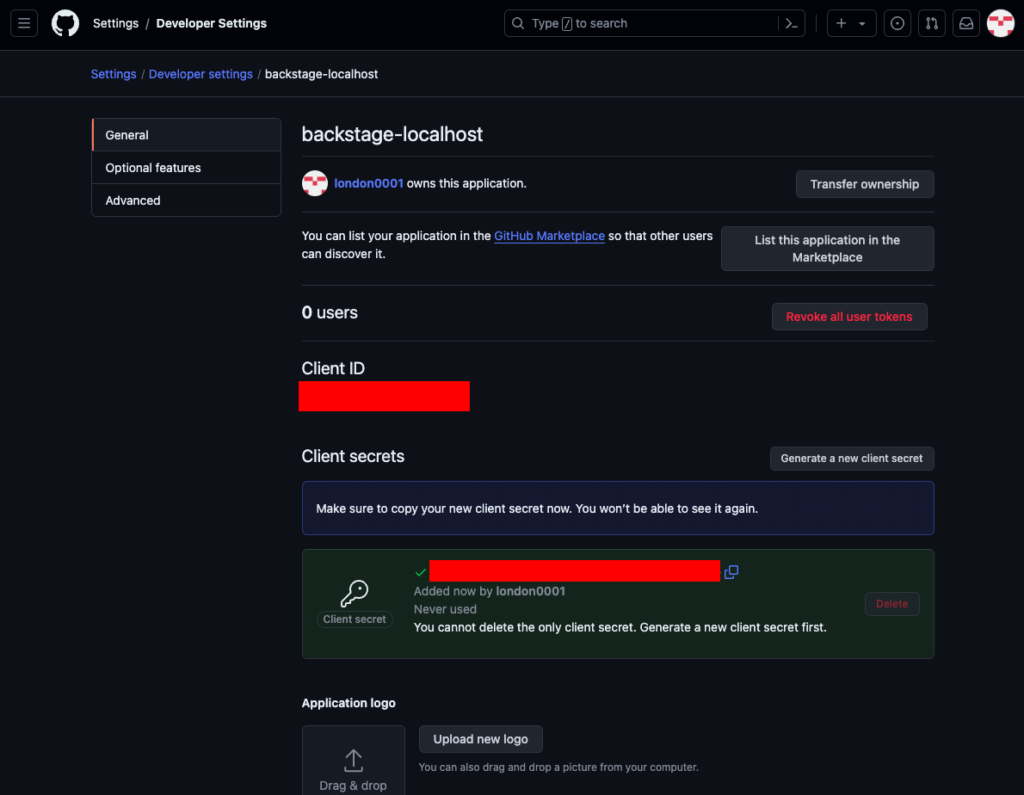
These credentials can be added to `.env`

The provider configuration can then be added to your `app-config.yaml` under the root auth configuration:
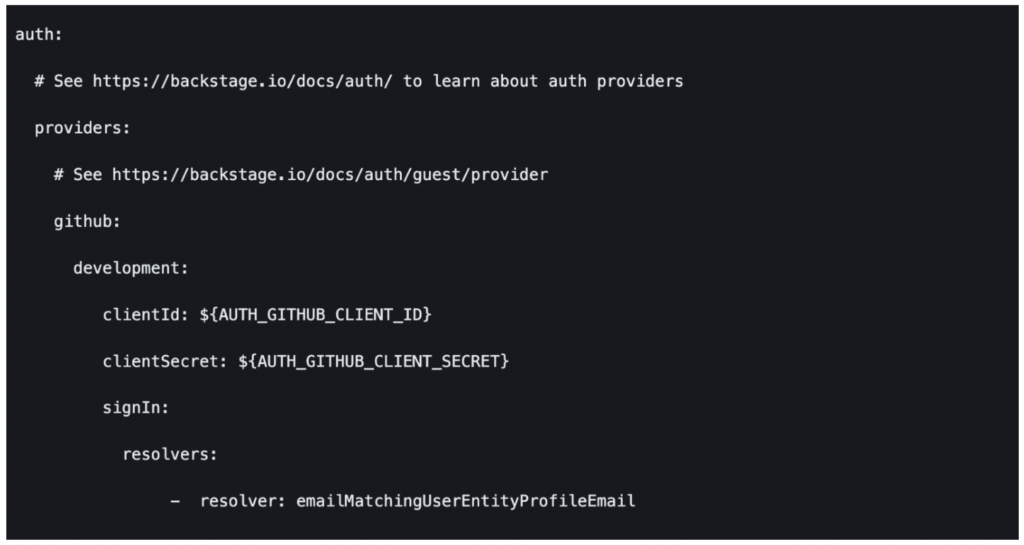
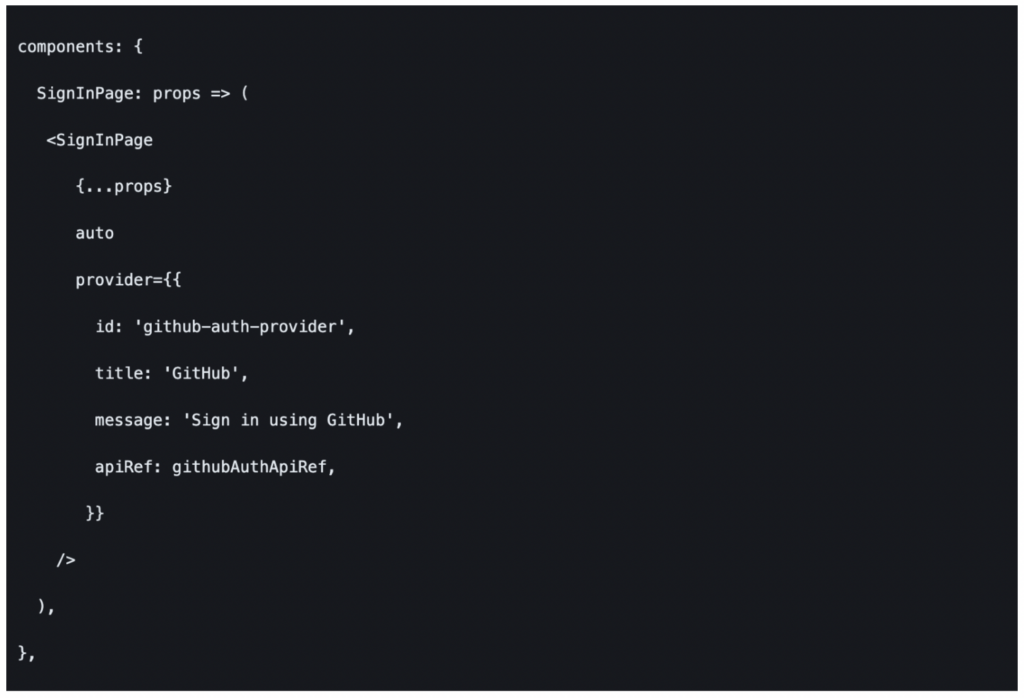
Add the sign in provider to the UI updating the `packages/app/src/App.tsx` adding these two sections, import the plugin

And configure the sign in page
Update the backend to include the GitHub authentication plugin, add the following line at `packages/backend/src/index.ts`

Now if you run `yarn dev` there is a sign in page that redirects you to the provider in this case GitHub
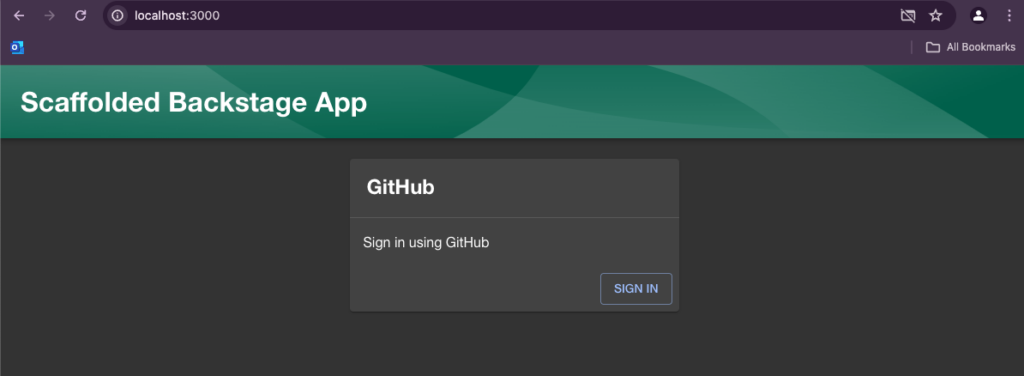

So far, the only configuration we have completed is for your localhost. If you intend to deploy this to a containerised environment to accommodate more users, the next section will demonstrate how to create the container, configure the credentials, and install it in AWS (Amazon Web Services) ECS Fargate.
Additionally, it will cover how to configure the GitHub authentication mechanisms to ensure that only your authorized users can interact with your Backstage instance.
Run

To run the container locally you can run this command:

Configuring your software catalogue
Until this point, the Backstage service has been configured for your use. Customisations will be made within this source code. However, Backstage heavily relies on Git files to store your software catalogue.
The Postgres database, recommended for production environments, serves as a temporary cache from which the service retrieves your data. Nonetheless, the repositories serve as the primary source of data. There are 3 approaches to this:
- Multiple repositories: Consolidating all your software catalogues into a single repository is not advisable, especially if you are starting from scratch. It is more prudent to store the catalogue information within each repository. Backstage can then crawl your GitHub repositories, searching for new components as needed.
- Single repository: Establishing a centralised repository to store your entire catalogue may be an ideal strategy, particularly if you already manage multiple repositories. In such cases, you can leverage batch processing to generate the catalogue.
- Hybrid: I recommend a hybrid approach in which each repository contains its own catalogue information alongside a dedicated repository for storing shared data like users, groups, and component taxonomy.
I’d recommend maintaining your Backstage platform in a read-only state. This practice aids in governance enforcement, primarily through repository pull requests. Permitting developers to create new templates may not align well with an IDP, especially for an enterprise striving to keep a consistent development environment. Nevertheless, this approach may not align with your specific use case.
In Backstage, you can define different entities in your catalogue. These entities are: User, Group, Component, System, API, Resource, Location, and Domain. These entities create a taxonomy because they are related to each other. The following diagram shows this relationship.
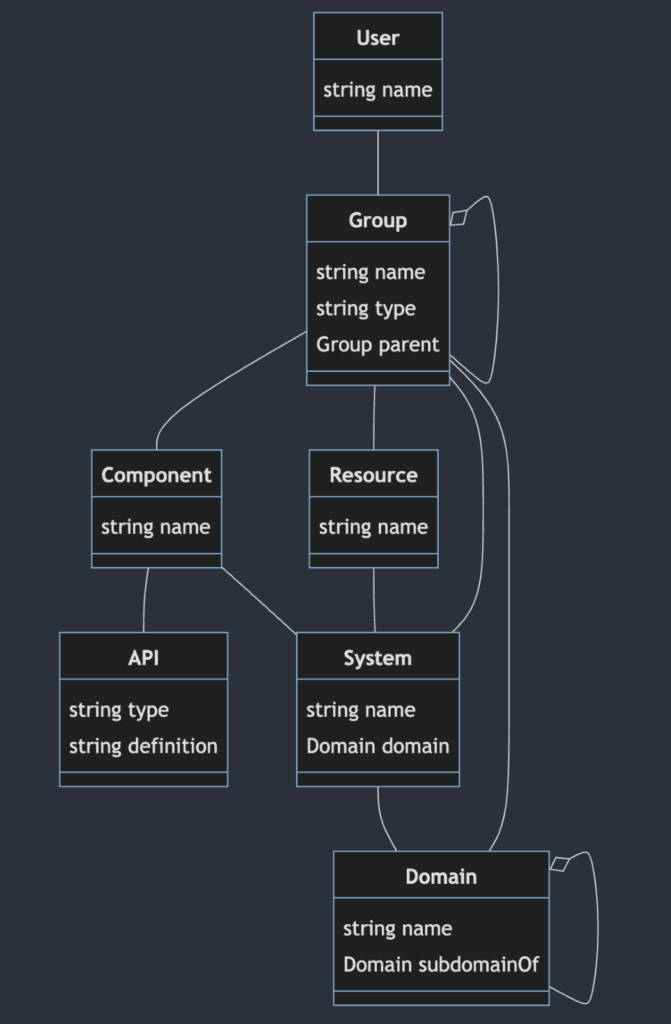
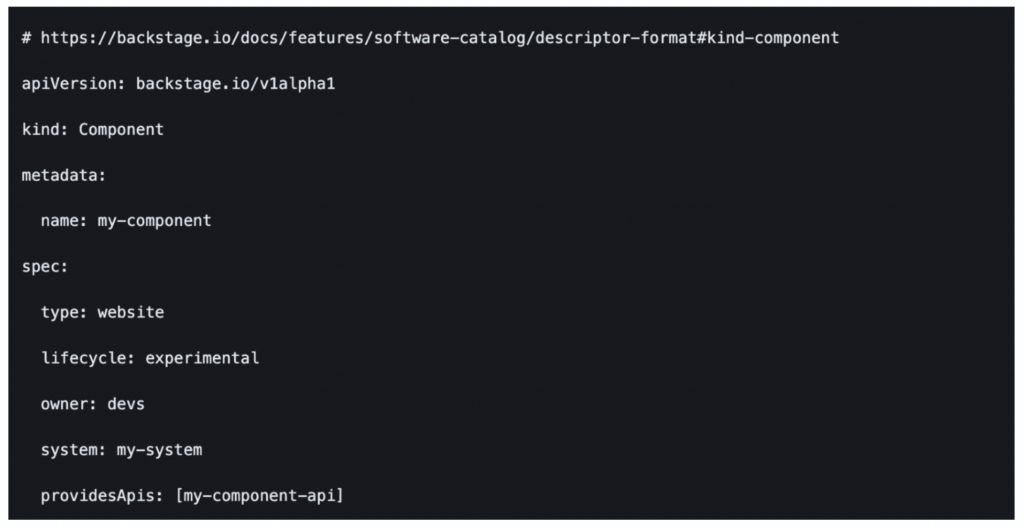
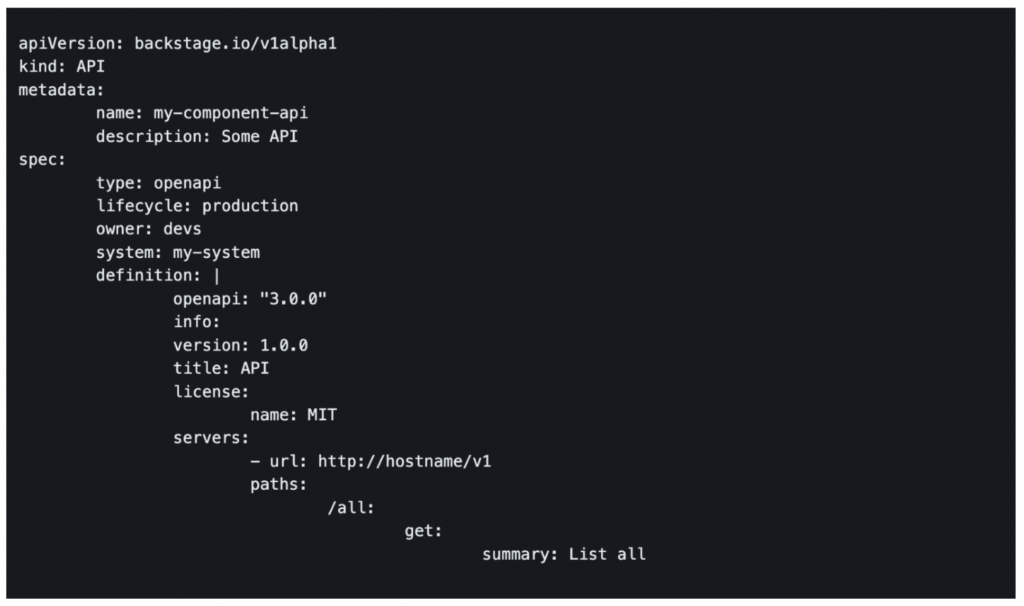
All these definitions are created in YAML files and stored in your GitHub repository. Bear in mind that the two building blocks for your catalogue are components and resources. The other entities provide additional context, indicating where these entities belong and to which teams. The API entity acts more like a decorator for the component entity; not all components are APIs, but if you need to define one, you can use the OpenAPI specification to provide more context and documentation.
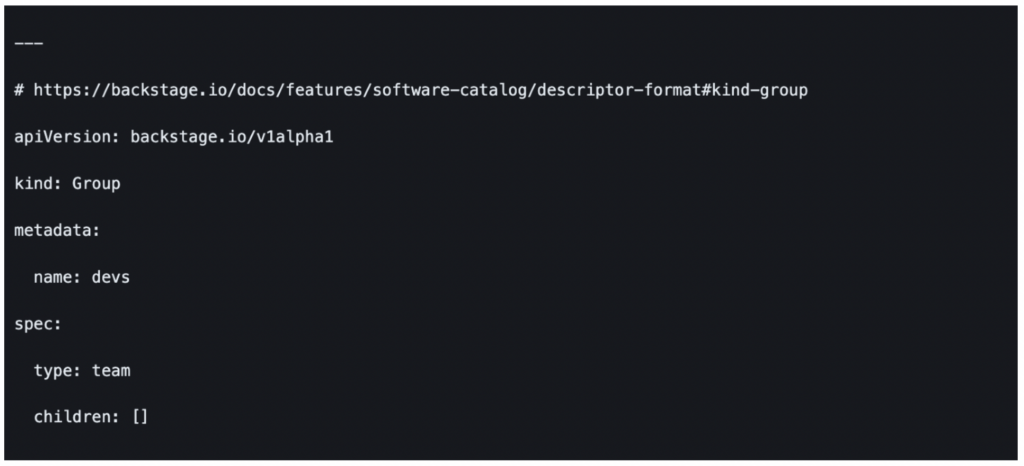
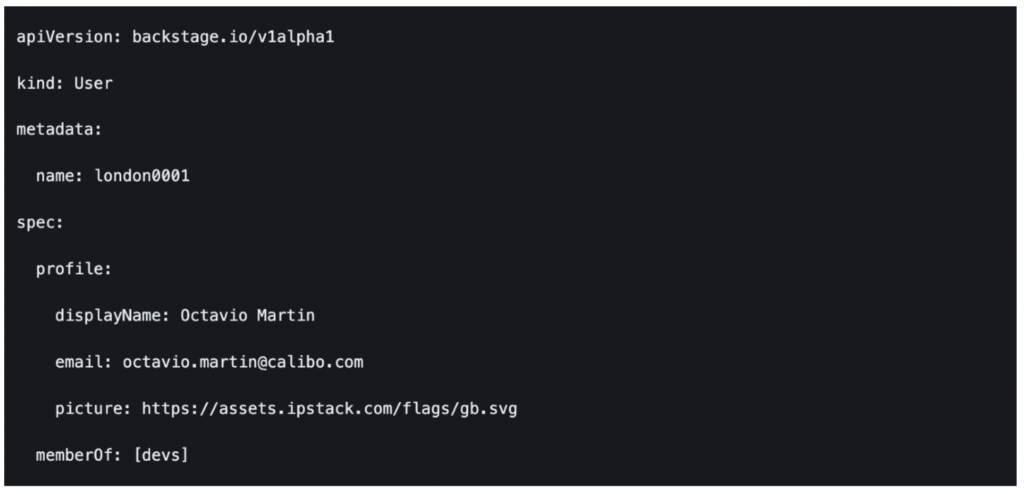
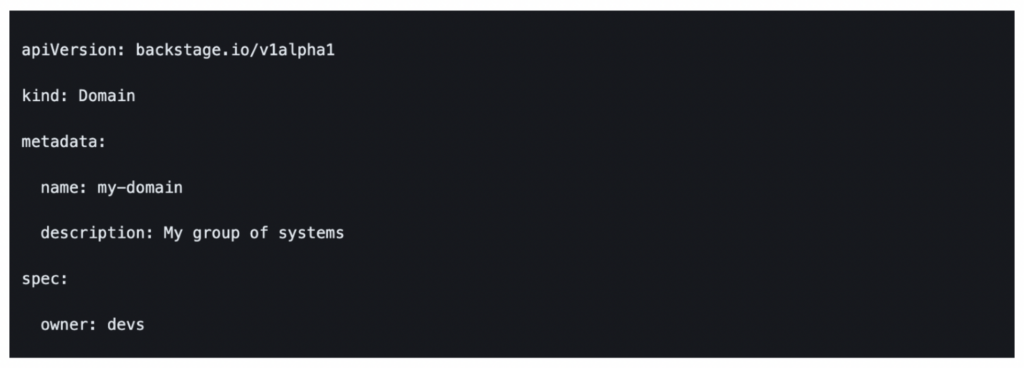
Here are some examples of defining your teams and grouping your components and resources. As I have recommended before, the best approach is a hybrid one. In this approach, you maintain a dedicated repository for defining common entities such as Groups, Users, Domains, and Systems.
Meanwhile, the component and resource definitions are kept together with the repository that contains the actual source code. This method ensures that your common entities are centrally managed while keeping component-specific details close to the source code for easier maintenance and clarity. Here are some examples of these definitions:
Group
User
Domain
System
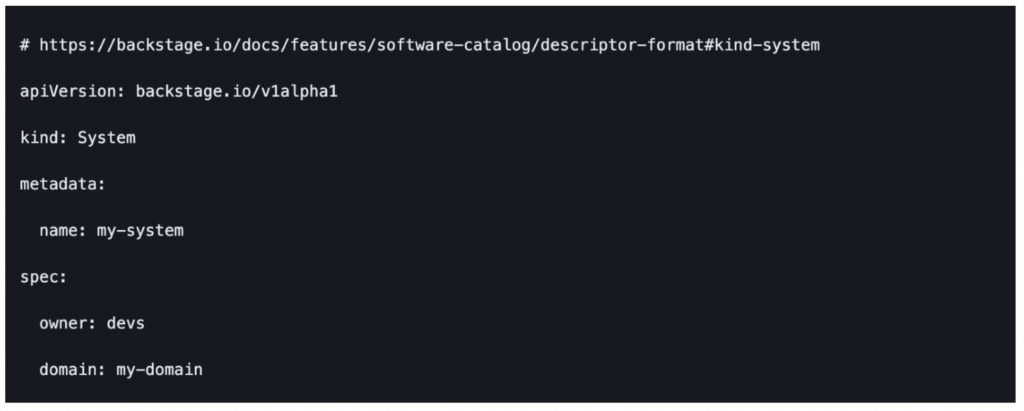
A component might be an API or a website, whereas a resource could be a database, a Kubernetes cluster, or an AWS S3 bucket. Extending these types would require deep TypeScript knowledge, which is beyond the scope of this post.
Component
API
Resource

Configuring repository templates in Backstage
Out-of-the-box, Backstage offers a template engine for customising the creation of new repositories. Dynamic forms can be generated to populate placeholders in your repository templates. Additionally, new actions can be triggered to enhance your workload configuration.
Repository generation
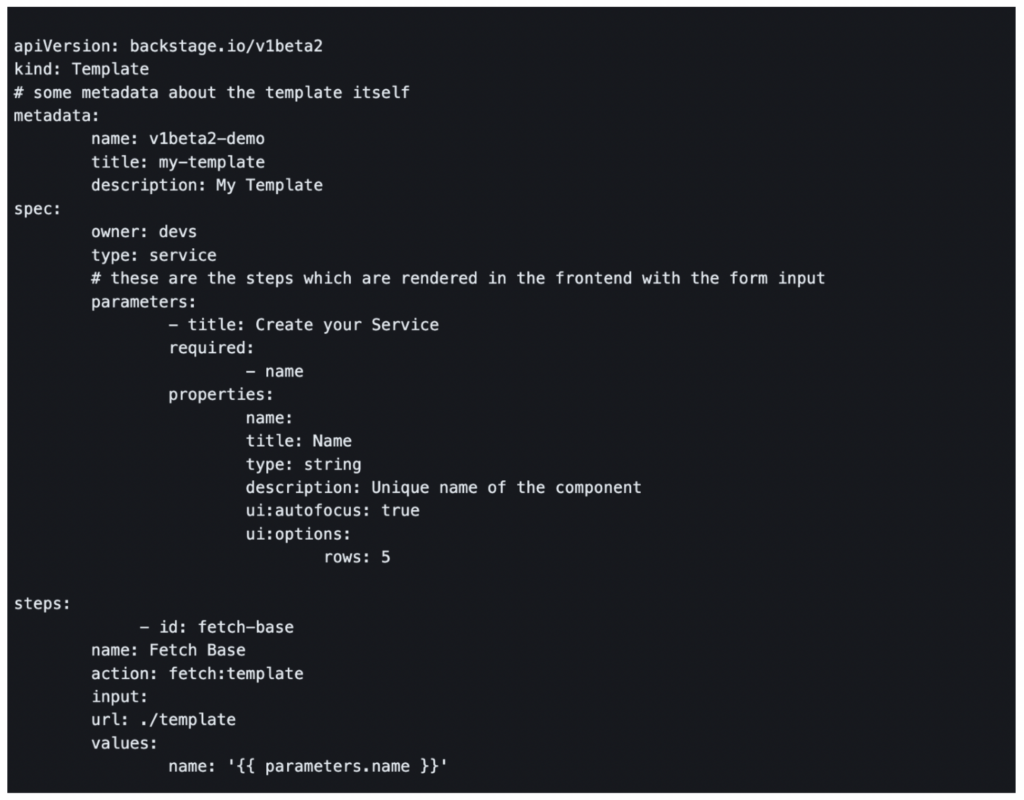
The entity to consider is the Template entity. This defines how new repositories can be created from a catalogue of templates. It also specifies what parameters can be customised and how the UI will be generated to set these values. Additionally, you could create custom actions that can be called during creation.
This is particularly useful when you need to extend the normal functionality and adapt it to your own internal development tools. For instance, you might want to integrate it with your CI/CD pipelines or AWS permissions systems.
The following configuration creates a repository in GitHub from a Backstage.io’s Template:
Navigating additional configurations: Beyond the repository
Working with Backstage.io to orchestrate deployments can be quite a journey. One thing I have experienced is that setting up the repository source code, especially the code related to CI/CD orchestration, involves a fair bit of effort.
- At its core, Backstage.io provides a dynamic web form generator that acts as a data entry point for template placeholders. The data and the template engine generate your repositories. If you need to configure additional settings outside of the repository, such as permissions in other systems, dashboards, or alarms, it requires some special TypeScript code installed into your Backstage backend.
- For instance, if you want to add the AWS access key ID and AWS access secret for your pipelines to access your AWS Account, you will need to manually code an action and install it into Backstage.io. Unfortunately, this task becomes more complex because Backstage.io does not support native or secure secret storage out of the box. You will need to provide one.
- If you’re using AWS, you could use AWS Secrets Manager or SSM Parameter Store, and if you’re running on Kubernetes, you could use the Kubernetes native secret manager. However, these options require extra maintenance beyond what Backstage offers. Of course, a plugin can be written to handle this, but the openness of Backstage also means more maintenance.
- Despite these challenges, the flexibility and potential of Backstage.io make it a powerful tool for managing deployments. With a bit of extra work, you can customise it to fit your specific needs.
In my experience, there are certain aspects that could enhance the adoption of this IDP. These include support for multiple cloud accounts, a more flexible taxonomy for the software catalogue enabling better grouping of components, and improved integration with other entities.
In Backstage, a repository serves as the main entity around which everything is configured. However, a product contains more than just source code. You could encounter data pipelines, workloads, clusters, AWS accounts, and more. All these entities together constitute a product, a piece that aligns with a business need.
Therefore, having better integration with these additional entities would enhance the overall functionality and usefulness of Backstage.
Conclusion
While Backstage offers a fantastic array of plugins through its marketplace, it’s important to keep in mind that it also brings some inherent complexities and maintenance needs. This post didn’t delve into deploying it to a cloud provider, monitoring it, or upgrading it, so remember that these tasks will add more layers of complexity.
Choosing the right solution depends on your distinct needs, the scale of your company, and your budget. Whether your goal is to utilize open-source tools, bring in specialized expertise, or invest in an all-inclusive SaaS solution, this blog is here to guide you toward the optimal decision for your business.
Check out Calibo’s IDP here. Or, for a more detailed view, see the IDP factsheet here.
Topics
Trending articles

Overcoming the overwhelm: How Enterprise Architects can get more support for technology led innovation
Enterprise Architects (EAs), this one is for you! If the constant pressure to align tech strategies with business goals has you feeling cornered, you’re not alone. Today, you need to juggle numerous challenges—from siloed operations stalling projects to the rapid emergence of AI altering traditional frameworks. Yet, with the right strategies, EAs can transform…

Why combine an Internal Developer Portal and a Data Fabric Studio?
Are you asking this exact question? You’re not alone! Many IT leaders are on a quest to improve efficiency and spark innovation in their software development and data engineering processes. You may wonder why it’s a good idea to combine an Internal Developer Portal and a Data Fabric Studio – what’s the benefit? What IT…

Data mesh vs data fabric: Understanding key differences and benefits
One thing I love about working in tech is that the landscape is constantly changing. Like the weeping angels in Dr Who – every time you turn back and look – the tech landscape has moved slightly. Unlike the weeping angels, however – this progress is for the betterment of all. (And slightly less murderous).…

Best practices for developing AI solutions with a self-service platform
Enterprises are feeling increasing pressure to integrate Artificial Intelligence (AI) into their operations. This urgency is pushing leadership teams to adjust their investment strategies to keep up. Recent advancements in Generative AI (GenAI) are further increasing this pressure, as these technologies promise to enhance productivity and efficiency across the organization. For example, Gartner™ expects GenAI…

More from Calibo
One platform, whether you’re in data or digital.
Find out more about our end-to-end enterprise solution.